Read our latest: The year so far & 1.0 update.
 For quite a while now we've spoken about it being possible to use any framework/library (e.g. Backbone, Angular, Ember, React, Polymer) within a BladeRunnerJS (BRJS) app. Angular is by far the most popular front-end framework right now so it makes sense to demonstrate how to use it with BRJS first.
Although we've done some work internally to ensure AngularJS can be used within a BRJS app we need to do more. We need to:
This post will go some way to helping with all three of these things, although I'm sure we can do more to help with getting started in the future. My approach for "best practice" when using Angular within a BRJS app will be to break a commonly used application into features/components and build each of these features in isolation as Angular Directives. Ideas for best practice will undoubtedly evolve over time, but this provides a good starting point.
The application that we're going to re-create using BRJS is the Angular version of the Todo MVC application. We'll also try to reuse as much code as possible from the default Todo MVC Angular app.
Please provide your feedback by raising issues and pull requests against the BRJS and Angular Todo MVC repo.
This post is about how to use Angular with BRJS and BRJS Applications Architecture. So, we're not going to cover:
The purpose of BladeRunnerJS is to provide an "out of the box" solution that gives you everything you need to build a scalable modular front-end application - from tooling to an application architecture. BRJS applications consist of:
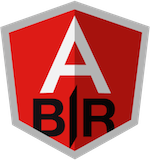
Within our Todo application we'll have three blades:
We'll have a single service that will provide Todo specific functionality:
The service will be defined within a library to keep it separate from the blades.
The BRJS toolkit comes with an executable CLI that provide you with everything you need to automate common tasks when building BRJS apps. This includes scaffolding your app, a development server, running your blades in isolation in workbenches, running tests, running your full app and more. The CLI can be found within the BladeRunnerJS/sdk/ directory. Execute ./brjs help to find out more.
In order to follow the rest of the tutorial you'll need to download BRJS v0.12 or later:
Use the create-app command to scaffold a BRJS application.
$ ./brjs create-app brjstodo
The above command will create an application called brjstodo within the brjs-apps directory (BladeRunnerJS/brjs-apps/brjstodo/). That directory will have the following contents:
brjs-apps/brjstodo
├── app.conf                  # Application configuration
├── index.html                # Application entry point
├── libs                      # Other app libraries
├── resources                 # For other app resources
├── src                       # For app-level JavaScript
├── test-acceptance       # Application acceptance tests
├── test-unit                 # Application unit tests
├── themes                    # CSS and images
└── unbundled-resources # Assets that shouldn't be minified and bundled
We know we're going to be using Angular so before we do anything else let's add the angular.js library to the applications. Third-party Libraries are easily added to a BRJS application.
Within brjs-apps/brjstodo/libs create an angular directory. Within that directory add the angular.js JavaScript library. Finally, create a thirdparty-lib.manifest with the following contents:
exports: window.angular
The purpose of this manifest file is to define how the contents of the angular library directory are used. In this case everything will be bundled (well, just the angular.js file). The exports property identifies the JavaScript object to be exported from the module. For more information on the manifest file see the BRJS libraries docs.
Angular can now be required and used in JavaScript using:
var angular = require( 'angular' );
The trend towards building componentised web apps continues so as well as each blade representing a feature within our Todo app it will also be a component.
Note: there are other ways to use Angular within a BRJS app. We'll potentially cover this in the future.
First, let's scaffold out the Input blade using the CLI:
$ ./brjs create-blade brjstodo default input
Note: default is presently required but we'll remove the need for it in the future.*
This will create all the basic assets required for the blade within the default blades location: brjs-apps/brjstodo/blades/input. The contents will be as follows:
blades/input
├── resources
│       ├── html    # HTML templates
│       └── i18n    # Language files
├── src               # JavaScript
├── test-acceptance # Application acceptance tests
├── test-unit         # Application unit tests
├── themes            # CSS and images
└── workbench         # Files to run the blade in isolation
Now we have the basic app and blade skeleton in place we can create an Angular Directive that represents the input component for the Todo app.
First we should define the HTML template. The convention here is to separate HTML and JavaScript so let's update the existing view.html within the blades/input/resources/html/ directory with the following content:
<header id="brjstodo.input.view-template" class="input-component">
    <h1>todos</h1>
    <form id="todo-form" ng-submit="addTodo()">
        <input class="todo-input" placeholder="What needs to be done?" ng-model="newTodo" autofocus>
    </form>
</header>
Next, create an InputDirective.js file within blades/input/src with the following:
'use strict';

var ServiceRegistry = require( 'br/ServiceRegistry' )

var InputDirective = function() {
    var HtmlService = ServiceRegistry.getService( 'br.html-service' )

    this.restrict = 'E';
    this.replace = true;
    this.template = HtmlService.getHTMLTemplate( 'brjstodo.input.view-template' ).outerHTML;

    this.controller = function( $scope ) {
        $scope.newTodo = '';
        $scope.addTodo = function() {
            var newTodo = $scope.newTodo.trim();
            if (!newTodo.length) {
                return;
            }

            var todoItem = { title: newTodo };
            /*** new code ***/
            // TODO: store the todo item
            console.log( todoItem );
            /*** end of new code ***/

            $scope.newTodo = '';
        }
    };

};

module.exports = InputDirective;
A few points to note: The directive is being defined as an object that needs to be instantiated rather than an object literal and the template HTML is being retrieved via the HtmlResourceService rather than using Angular. The latter is to take advantage of BRJS HTMl bundling.
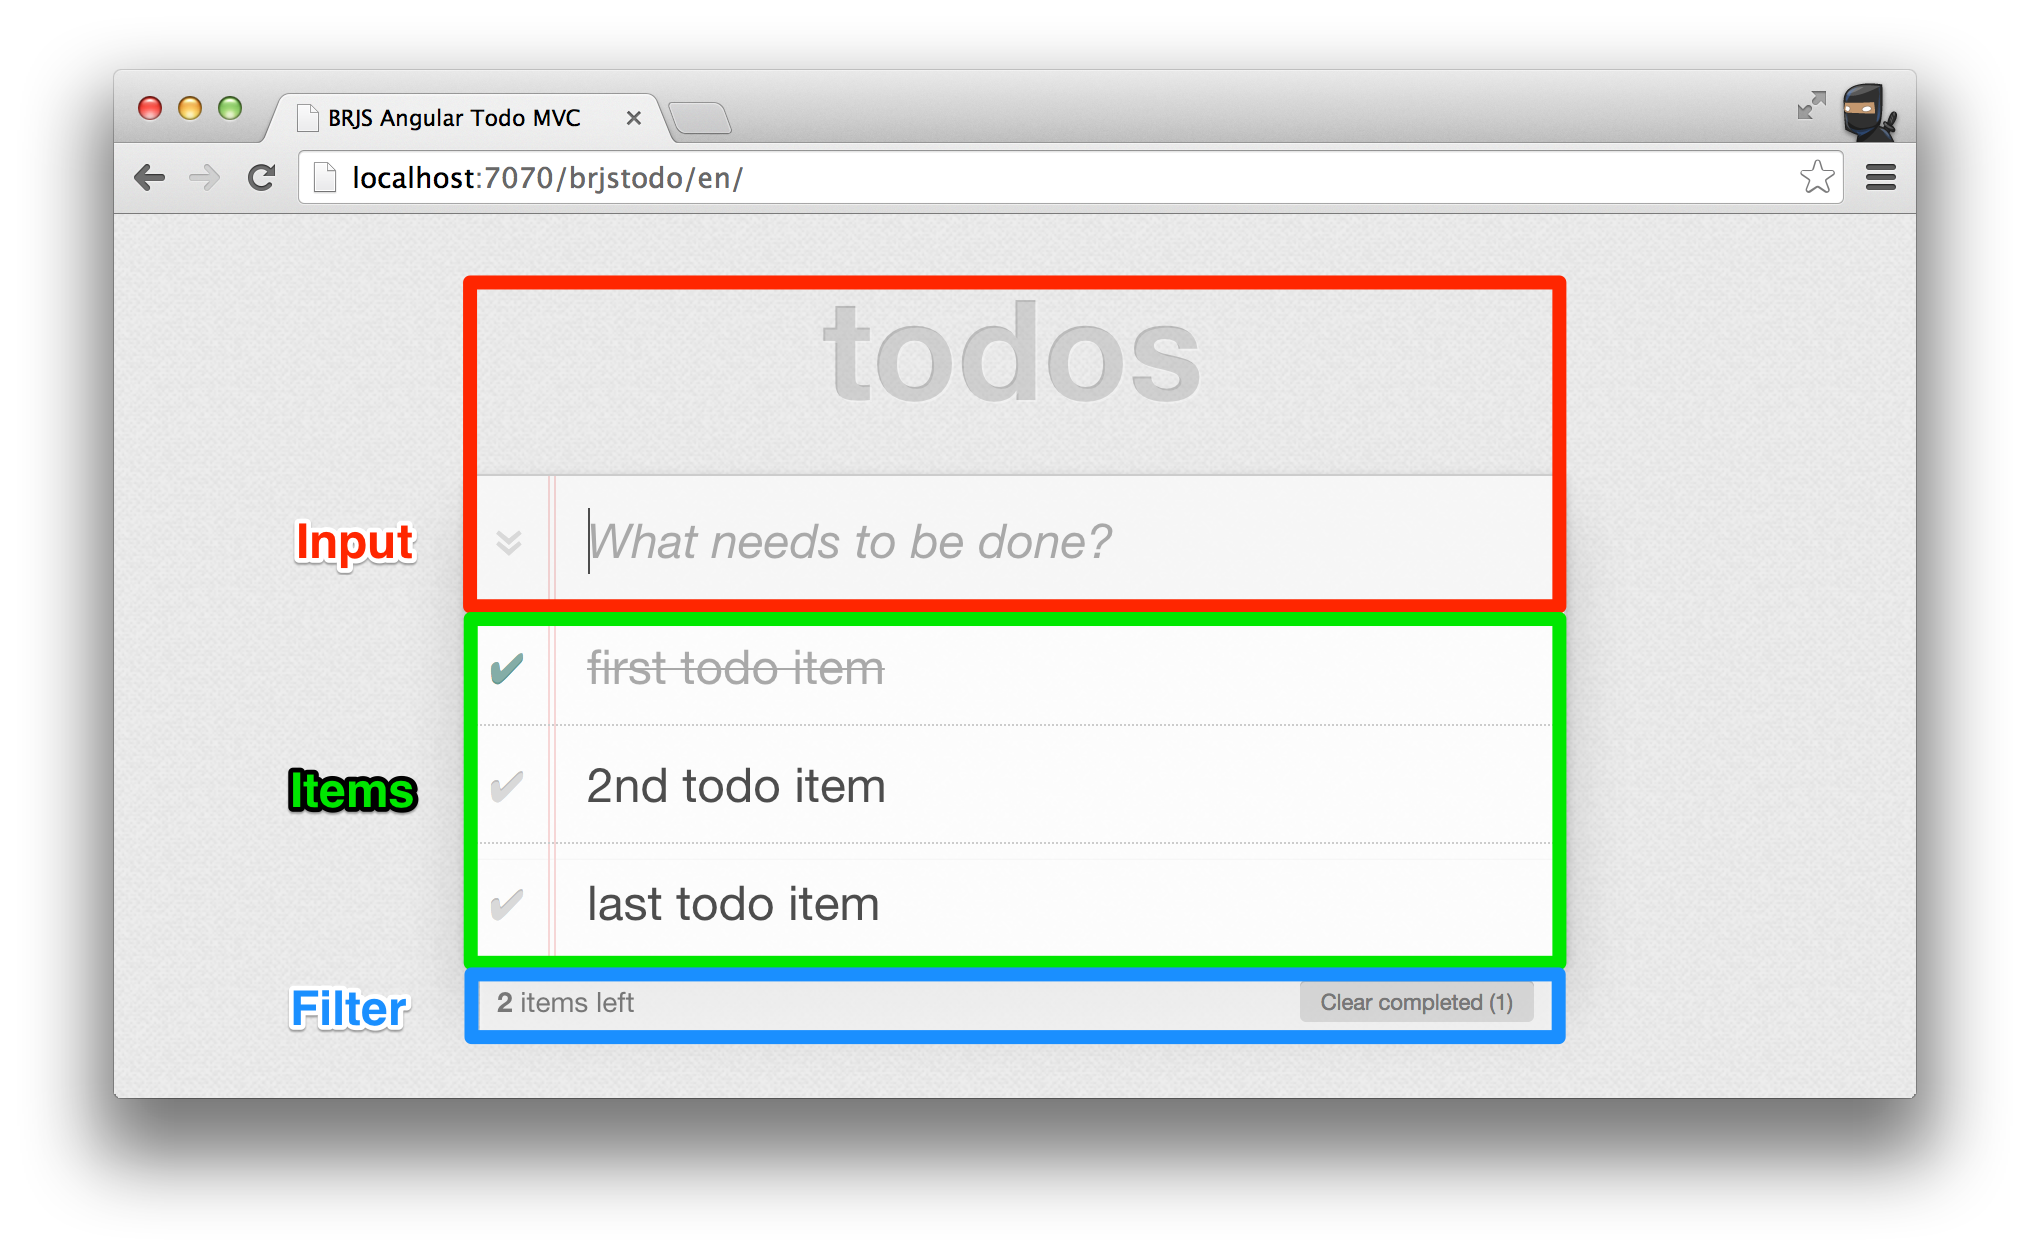
You'll also noticed that we're just logging the todoItem at the moment. We'll fix this shortly. But first let's see our directive Blade running in a workbench.
Right now BRJS doesn't offer alternative templating support so the default blade template creates you files related to Blades that use KnockoutJS. One of these files is the blades/input/workbench/index.html file. This file is there to let you run and develop your blade in isolation (in a workbench).
We need to update this to display our Angular directive. To do this replace the JavaScript below the // ViewModel that is being created in the workbench comment, including the calls to addModelViewer and addComponent, with the following:
var angular = require( 'angular' );
var InputDirective = require( 'brjstodo/input/InputDirective' );
angular.module('brjstodo', [])
    .directive('todoInput', function() {
        return new InputDirective();
    } );
Additionally, add the following after the </script> closing tag:
<style>
    .ng-workbench {
        position: relative;
        top: 100px;
        margin: auto;
        width: 450px;
    }
</style>


<div class="ng-workbench" ng-app="brjstodo">
    <todo-input></todo-input>
</div>
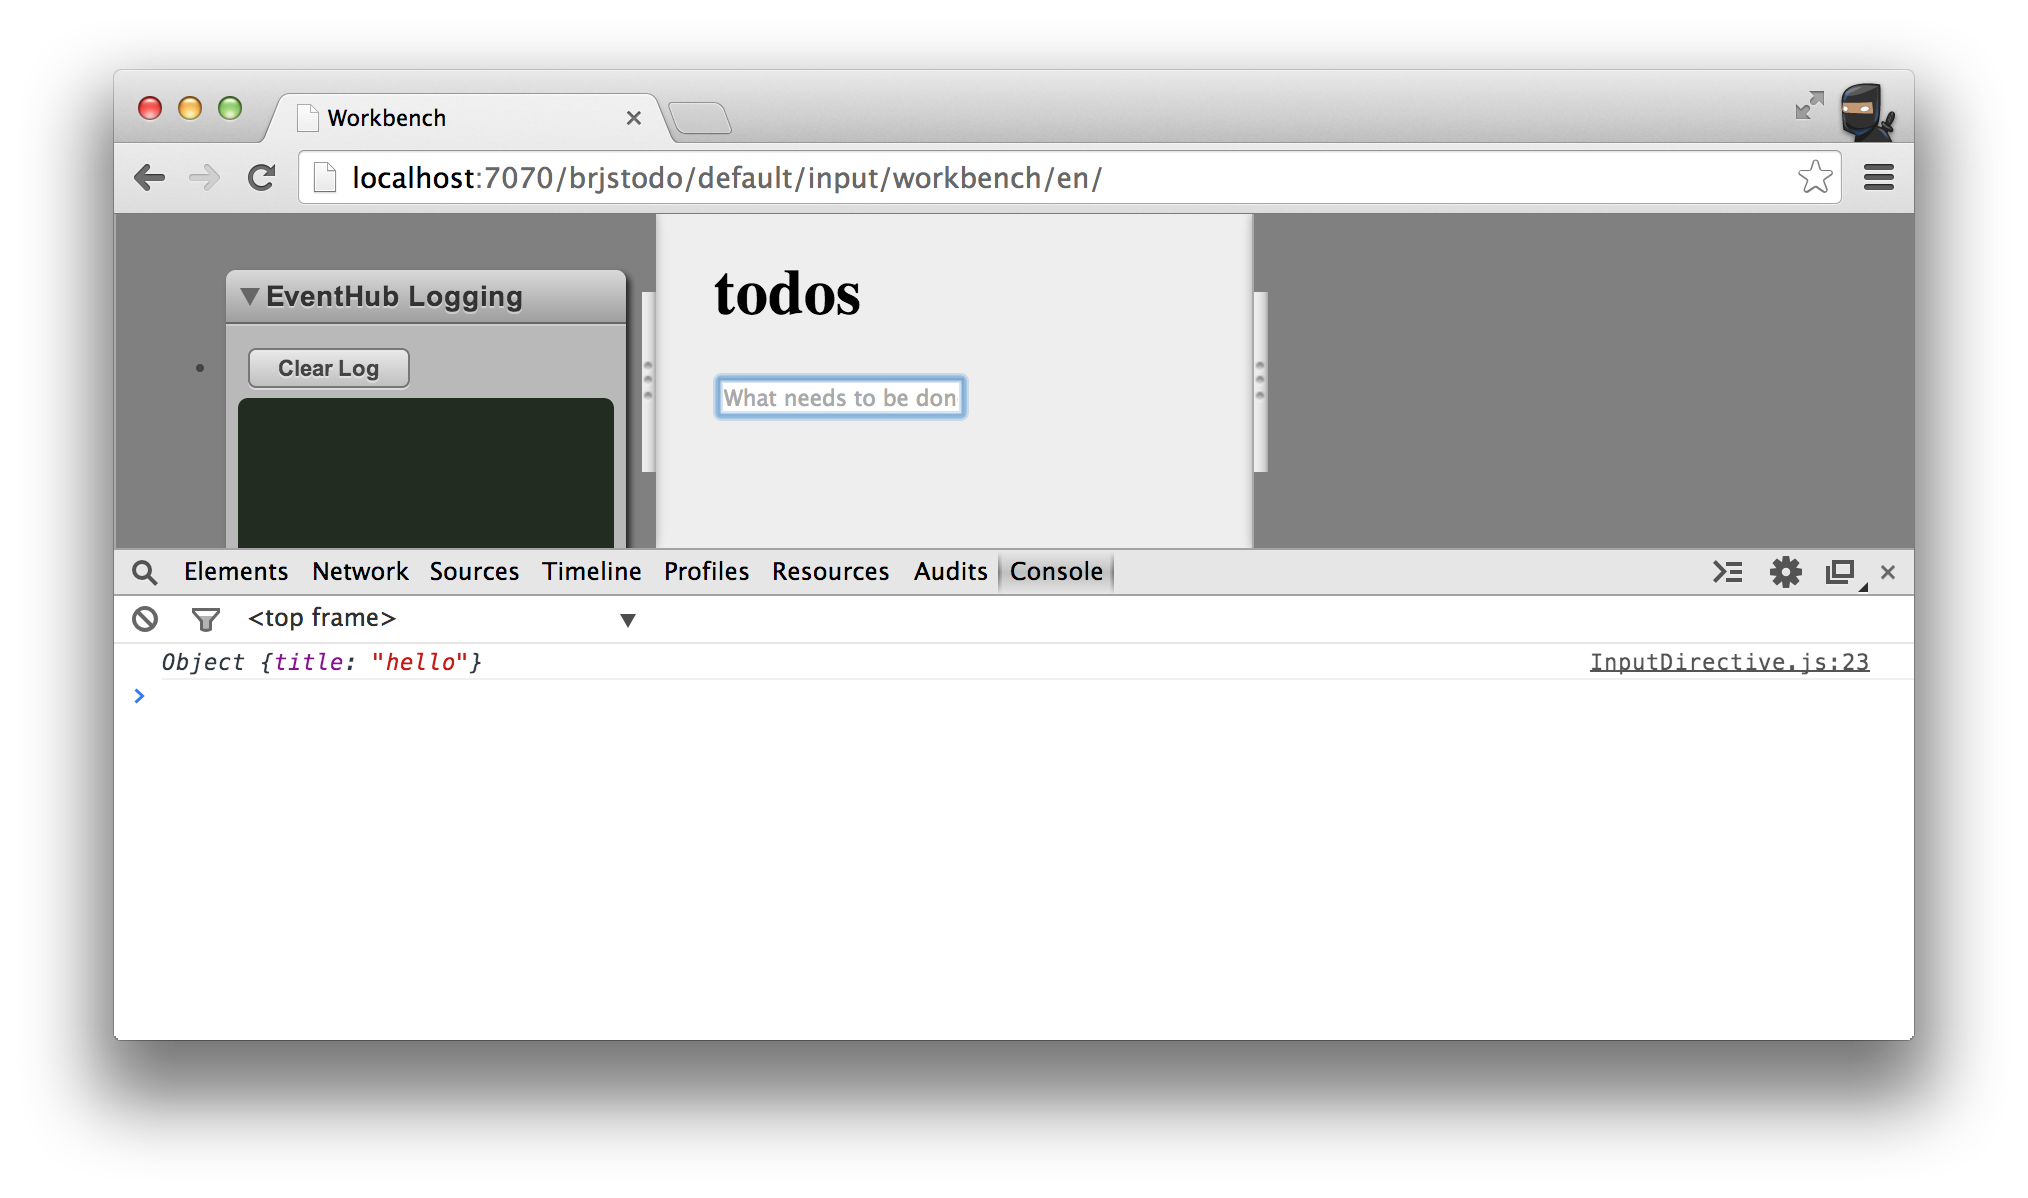
The <todo-input></todo-input> directive is now in the workbench. We can view the workbench by running the BRJS dev server using ./brjs serve and then navigating to http://localhost:7070/brjstodo/default/input/workbench/en/.
Styles can be defined either within the blade or within the application entry point (the aspect). When the CSS concatenation (bundling) takes place the blade CSS will first be included and then the entry point CSS. The purpose of including the CSS in this order is so that an application can override blade CSS and thus it can more easily be reused and a different "skin" applied.
Anyway, to make things simple and focused let's just download two assets and put them in the brjs-apps/brjstodo/themes/common/ directory:
CSS and images in this directory will be bundled with all themes. When you refresh the workbench you'll now see styling applied to the input blade.
Next, we can take a look at persisting the todo item and also ensure that items blade is informed about the new item. We achieve this using services - let's create a TodoService to handle this.
As mentioned earlier, services can be used for "accessing shared resources" and for "inter-blade communication" which is exactly what we want to do here. We want to persist todo items and we want the items blade to be informed of the new todo item.
Let's create the TodoService within a library. Libraries can be scaffolded using the BRJS CLI.
$ ./brjs create-library brjstodo todomvc
This creates a directory called todomvc within brjs-apps/brjstodo/libs/ with the following structure:
brjs-apps/brjstodo/libs/todomvc
├── br-lib.conf
├── src
└── test-unit
Within the src directory create a TodoService.js file with the following contents (you can delete or ignore the file that's created by default):
var br = require( 'br/Core' );
var Emitr = require( 'emitr' );

var TODO_ITEMS_ID = 'brjs-todo-items';

function TodoService() {
    var items = localStorage.getItem( TODO_ITEMS_ID );
    this._items = ( items ? JSON.parse( items ) : [] );
}
br.extend( TodoService, Emitr );

TodoService.prototype.addTodo = function( item ) {
    this._items.push( item );
    this._sync();
    this.trigger( 'todo-added', item );
};

TodoService.prototype.updateTodo = function( item ) {
    this._items.forEach( function( existingItem, index ) {
        if ( item === existingItem ) {
            // since check is by reference there's no need for the following line
            // this._items[ index ] = item;
            this._sync();

            this.trigger( 'todo-updated', item );

            return false;
        }
    }, this );
};

TodoService.prototype.removeTodo = function( item ) {
    this._items.forEach( function( existingItem, index ) {
        if ( item === existingItem ) {
            this._items.splice( item, 1 );
            this._sync();

            this.trigger( 'todo-removed', item );

            return false;
        }
    }, this );
};

TodoService.prototype.getTodos = function() {
    return this._items;
};

TodoService.prototype._sync = function() {
    localStorage.setItem( TODO_ITEMS_ID, JSON.stringify( this._items ) );
    console.log( this._items );
};

module.exports = TodoService;
This is the full definition of a chat service that store and retrieves items to localStorage. Since this service is a simple object that doesn't have anything to do with Angular we'll ignore the details. For now we're only going to use the addTodo function from the input blade.
Before we can access the new service we need to register it with the ServiceRegistry - a place where service can be centrally registered and accessed. Within blades/input/workbench/resources you'll find an aliases.xml file. Add the following in order to ensure the new TodoService is registered and can be accessed from the ServiceRegistry using the unique ID of todomvc.storage:
<aliases xmlns="http://schema.caplin.com/CaplinTrader/aliases" useScenario="dev">
    <alias name="todomvc.storage" class="todomvc.TodoService" />
</aliases>
Within this in place you can now update blades/input/src/InputDirective.js to retrieve the service from the ServiceRegistry and call addTodo on it.
'use strict';

var ServiceRegistry = require( 'br/ServiceRegistry' )

var InputDirective = function() {
    var HtmlService = ServiceRegistry.getService( 'br.html-service' );
    /*** new code ***/
    var todoService = ServiceRegistry.getService( 'todomvc.storage' );
    /*** end of new code ***/

    this.restrict = 'E';
    this.replace = true;
    this.template = HtmlService.getHTMLTemplate( 'brjstodo.ng.input.view-template' ).outerHTML;

    this.controller = function( $scope ) {
        $scope.newTodo = '';
        $scope.addTodo = function() {
            var newTodo = $scope.newTodo.trim();
            if (!newTodo.length) {
                return;
            }

            var todoItem = { title: newTodo };
            /*** new code ***/
            todoService.addTodo( todoItem );
            /*** end of new code ***/

            $scope.newTodo = '';
        }
    };

};

module.exports = InputDirective;
Use the input blade in the workbench and every time you add a new item you'll see the current list of items output to the console.
We've done much more than just build our first feature. We've:
We can now push on with creating the next two Todo List features. The process of building the next two directive blades will be very similar to creating the input directive blade. This is great since one of the things we want when building complex applications is to do things in consistent ways.
Next up is the items blade; the blade that shows all the existing todo items, allows them to be edited, marked as complete and deleted.
First, scaffold out the blade:
$ ./brjs create-blade brjstodo default items
And then define the view for the items in blades/items/resources/html/view.html:
<section id="brjstodo.items.view-template" class="items-component" ng-show="todos.length" ng-cloak>
    <input name="toggle-all" type="checkbox" ng-model="allChecked" ng-click="markAll(allChecked)">
    <label for="toggle-all">Mark all as complete</label>
    <ul class="todo-list">
        <li ng-repeat="todo in todos | filter:statusFilter track by $index" ng-class="{completed: todo.completed, editing: todo == editedTodo}">
            <div class="view">
                <input class="toggle" type="checkbox" ng-model="todo.completed" ng-change="doneEditing(todo)">
                <label ng-dblclick="editTodo(todo)"></label>
                <button class="destroy" ng-click="removeTodo(todo)"></button>
            </div>
            <form ng-submit="doneEditing(todo)">
                <input class="edit" ng-trim="false" ng-model="todo.title" todo-escape="revertEditing(todo)" ng-blur="doneEditing(todo)" todo-focus="todo == editedTodo">
            </form>
        </li>
    </ul>
</section>
Next, create a file called ItemsDirective.js in blades/items/src to define our items Angular directive. Here's the full definition:
'use strict';

var angular = require( 'angular' );
var ServiceRegistry = require( 'br/ServiceRegistry' );

function ItemsDirective() {
    var HtmlService = ServiceRegistry.getService( 'br.html-service' );
    var todoService = ServiceRegistry.getService( 'todomvc.storage' );

    this.restrict = 'E';
    this.replace = true;
    this.template = HtmlService.getHTMLTemplate( 'brjstodo.items.view-template' ).outerHTML;

    this.controller = function( $scope ) {
        $scope.todos = todoService.getTodos();
        $scope.editedTodo = null;
        $scope.originalTodo = null;

        function update() {
            var todos = todoService.getTodos();
            var completedCount = 0;
            todos.forEach(function (todo) {
                completedCount += ( todo.completed? 1 : 0 );
            });
            $scope.allChecked = ( todos.length === completedCount );
        }

        // Note: could use $scope.$watch here. But that feels like magic.
        todoService.on( 'todo-added', update );
        todoService.on( 'todo-updated', update );
        todoService.on( 'todo-removed', update );

        $scope.editTodo = function (todo) {
            $scope.editedTodo = todo;
            // Clone the original todo to restore it on demand.
            $scope.originalTodo = angular.extend({}, todo);
        };

        $scope.doneEditing = function (todo) {
            $scope.editedTodo = null;
            todo.title = todo.title.trim();

            if (!todo.title) {
                $scope.removeTodo(todo);
            }
            else {
                todoService.updateTodo( todo );
            }
        };

        $scope.revertEditing = function (todo) {
            todo.title = $scope.originalTodo.title;
            todo.completed = $scope.originalTodo.completed;
            $scope.doneEditing(todo);
        };

        $scope.removeTodo = function (todo) {
            todoService.removeTodo( todo );
        };

        $scope.markAll = function (completed) {
            var todos = todoService.getTodos();
            todos.forEach(function (todo) {
                todo.completed = !completed;
                todoService.updateTodo( todo );
            });
        };

    };
}

module.exports = ItemsDirective;
The ItemsDirective already retrieves and interacts with TodoService so we need to ensure that it's registered with the ServiceRegistry. As before we do this by updating the aliases.xml for the workbench in blades/items/workbench/resources/aliases.xml:
<aliases xmlns="http://schema.caplin.com/CaplinTrader/aliases" useScenario="dev">
    <alias name="todomvc.storage" class="todomvc.TodoService" />
</aliases>
Finally, we want to show see the ItemsDirective running in isolation in the workbench as we did with the InputDirective. To do that we must update the workbench declaration in blades/items/workbench/index.html to include and define the directive:
var angular = require( 'angular' );
var ItemsDirective = require( 'brjstodo/items/ItemsDirective' );
angular.module('brjstodo', [])
    .directive('todoItems', function() {
        return new ItemsDirective();
    } );
Provide some styling to ensure the directive is displayed in the middle of the workbench:
<style>
    .ng-workbench {
        position: relative;
        top: 100px;
        margin: auto;
        width: 450px;
    }
</style>
And finally declare the workbench wrapper and the <todo-items> directive element:
<div class="ng-workbench" ng-app="brjstodo">
    <todo-items></todo-items>
</div>
All being well we can now see - and interactive with - the items directive running in the workbench via `http://localhost:7070/brjstodo/default/items/workbench/en/:
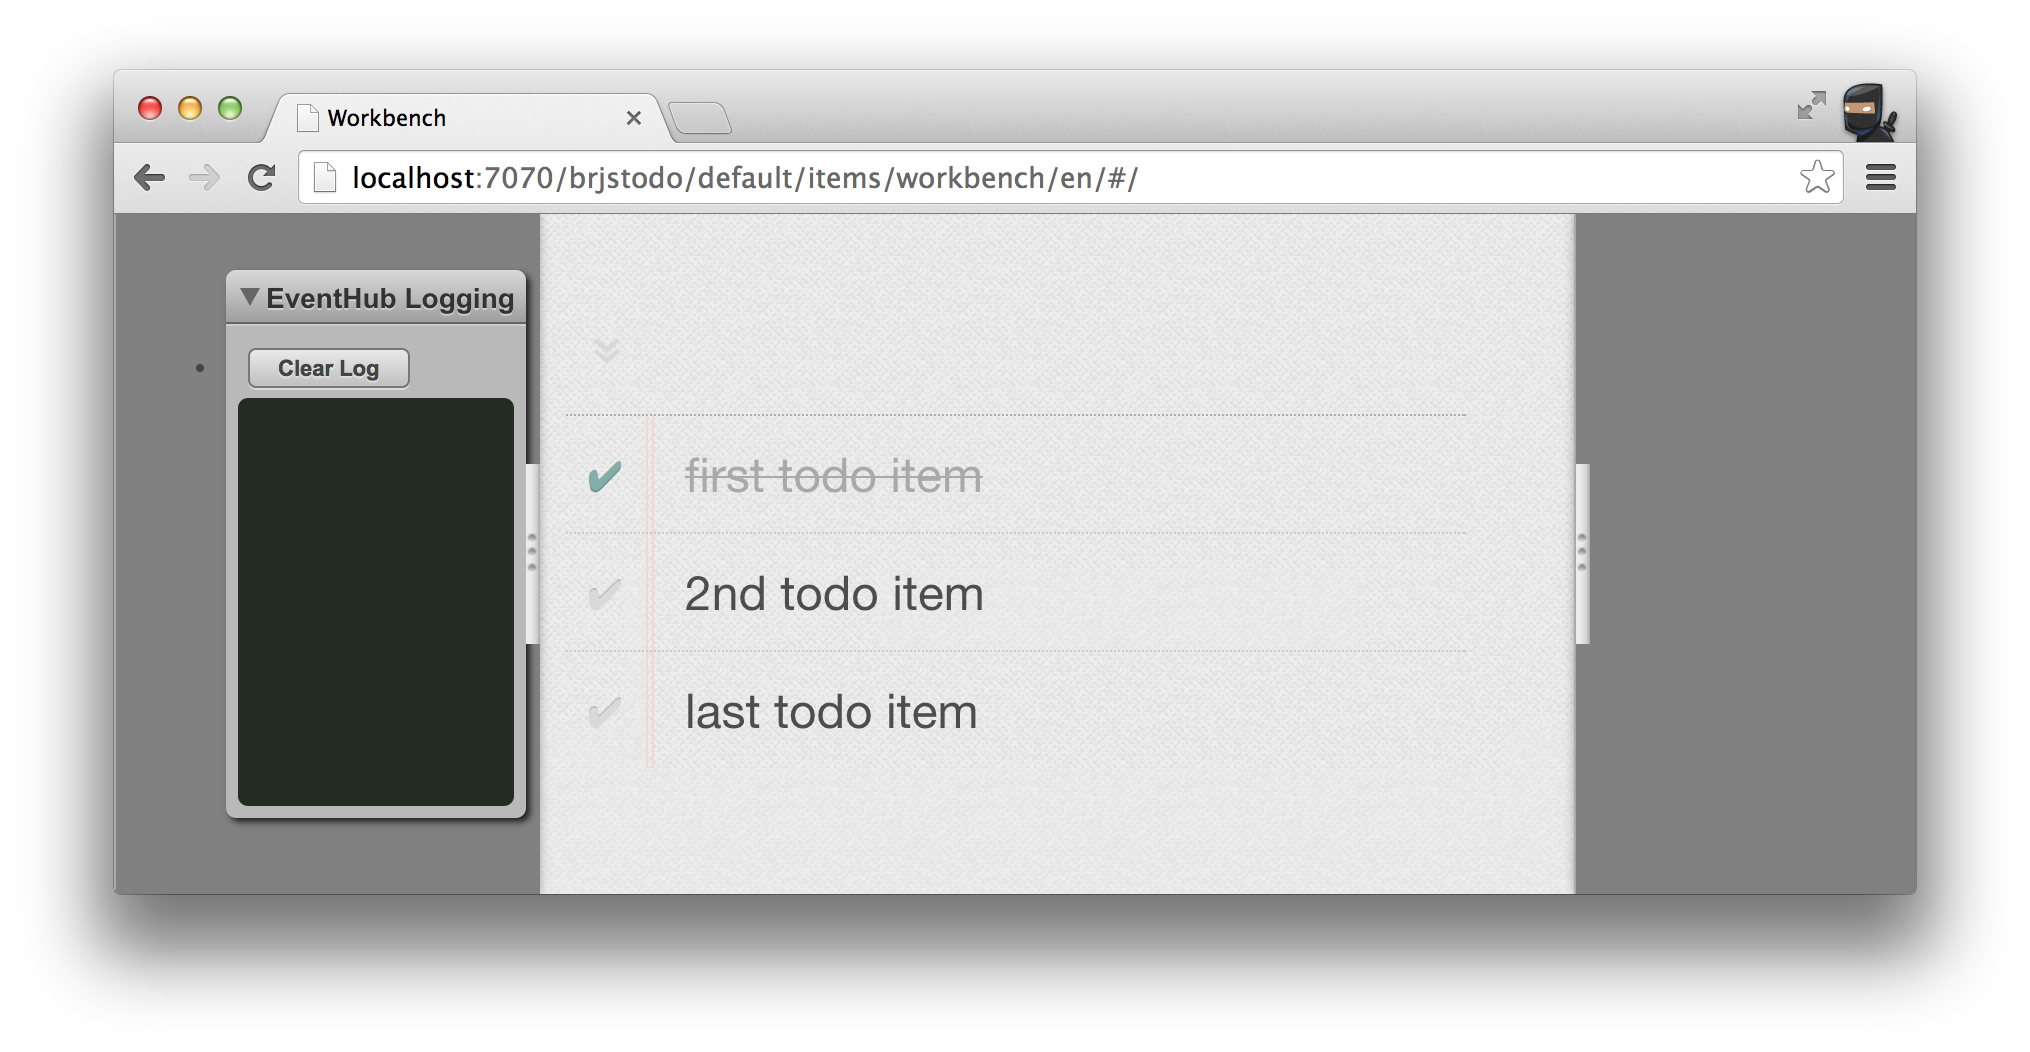
You can manually test the directive in a few ways:
ServiceRegistry.getService( 'todomvc.storage' ).addTodo( { title: 'test' } ) in the console (you may need to refresh the workbench)TodoService.addTodo in the workbench index.htmlOf course, during a normal development cycle you would use the workbench quite frequently as you make code changes as well as running the automated tests.
The last blade to create is the filter blade Angular directive that sits at the bottom of the app UI. To do this we following the exact same steps as we did with the other blades:
Scaffold out the blade using the CLI:
$ ./brjs create-blade brjstodo default filter
Define the filter directive view in blades/filter/resources/html/view.html:
<footer id="brjstodo.filter.view-template" class="filter-component" ng-show="todos.length" ng-cloak>
    <span class="todo-count"><strong></strong>
        <ng-pluralize count="remainingCount" when="{ one: 'item left', other: 'items left' }"></ng-pluralize>
    </span>

    <button class="clear-completed" ng-click="clearCompletedTodos()" ng-show="completedCount">Clear completed ()</button>
</footer>
Create a FilterDirective.js file in blades/filter/src:
'use strict';

var ServiceRegistry = require( 'br/ServiceRegistry' );

function FilterDirective() {
    var HtmlService = ServiceRegistry.getService( 'br.html-service' );
    var todoService = ServiceRegistry.getService( 'todomvc.storage' );

    this.restrict = 'E';
    this.replace = true;
    this.template = HtmlService.getHTMLTemplate( 'brjstodo.filter.view-template' ).outerHTML;

    this.controller = function( $scope ) {

        $scope.todos = todoService.getTodos();

        update();

        function update() {
            var todos = todoService.getTodos();
            var completedCount = 0;
            todos.forEach(function (todo) {
                completedCount += ( todo.completed? 1 : 0 );
            });
            $scope.remainingCount = ( todos.length - completedCount );
            $scope.completedCount = completedCount;
        }

        $scope.clearCompletedTodos = function () {
            var todos = todoService.getTodos();
            var todo, i;
            for( i = todos.length - 1; i >= 0; --i ) {
                todo = todos[ i ];
                if( todo.completed ) {
                    todoService.removeTodo( todo );
                }
            }
        };

        todoService.on( 'todo-added', update );
        todoService.on( 'todo-updated', update );
        todoService.on( 'todo-removed', update );
    }
}

module.exports = FilterDirective;
Update the workbench aliases definition (blades/filter/workbench/resources/aliases.xml) so the TodoService is available:
<aliases xmlns="http://schema.caplin.com/CaplinTrader/aliases" useScenario="dev">
    <alias name="todomvc.storage" class="todomvc.TodoService" />
</aliases>
And update the workbench (blades/filter/workbench/index.html) to set up the FilterDirective.
Add the definition:
var angular = require( 'angular' );
var FilterDirective = require( 'brjstodo/filter/FilterDirective' );
angular.module('brjstodo', [])
    .directive('todoFilter', function() {
        return new FilterDirective();
    } );
Add some styling:
<style>
.ng-workbench {
    position: relative;
    top: 100px;
    margin: auto;
    width: 450px;
}
</style>
Add the workbench wrapper and declare the todo-filter element:
<div class="ng-workbench" ng-app="brjstodo">
    <todo-filter></todo-filter>
</div>
Resulting in something like the following via http://localhost:7070/brjstodo/default/filter/workbench/en/:

But how do you bring each of the blade directives into the app? We've actually seen how you include and use the directives already when adding them to the workbench. We now just do that in the application entry point - the brjs-apps/brjstodo/index.html file at the root of the app. Replace the current contents with the following:
<!DOCTYPE html>
<html>
    <head>
        <meta charset="UTF-8">

        <title>BRJS Angular Todo MVC</title>

        <@css.bundle theme="standard" @/>

    </head>
    <body>

<!-- new code -->
        <div id="todoapp" ng-app="brjstodo">
            <todo-input></todo-input>
            <todo-items></todo-items>
            <todo-filter></todo-filter>
        </div>
<!-- end of new code -->


        <footer class="info">
            <p>Double-click to edit a todo</p>
            <p>Built with <a href="http://bladerunnerjs.org">BladeRunnerJS</a></p>
            <p>Part of <a href="http://todomvc.com">TodoMVC</a></p>
        </footer>

        <@i18n.bundle @/>
        <!-- dev-minifier can be set to "combined" for all JS content to be bundled with a single request -->
        <@js.bundle dev-minifier="none" prod-minifier="combined"@/>
        <script>
/*** new code ***/
            var InputDirective = require( 'brjstodo/input/InputDirective' );
            var ItemsDirective = require( 'brjstodo/items/ItemsDirective' );
            var FilterDirective = require( 'brjstodo/filter/FilterDirective' );

            var angular = require( 'angular' );
            angular.module( 'brjstodo', [] )
                .directive('todoInput', function() {
                    return new InputDirective();
                } )
                .directive('todoItems', function() {
                    return new ItemsDirective();
                } )
                .directive('todoFilter', function() {
                    return new FilterDirective();
                } );
/*** end of new code ***/
        </script>
    </body>
</html>
The main parts of the code are highlighted above. The HTML is added to declare the three directives, the directives are required and defined. It's nice, simple and clean.
Finally, we also need to set up the ServiceRegistry. Update brjs-apps/brjstodo/resources/aliases.xml:
<aliases xmlns="http://schema.caplin.com/CaplinTrader/aliases" useScenario="dev">
    <alias name="todomvc.storage" class="todomvc.TodoService" />
</aliases>
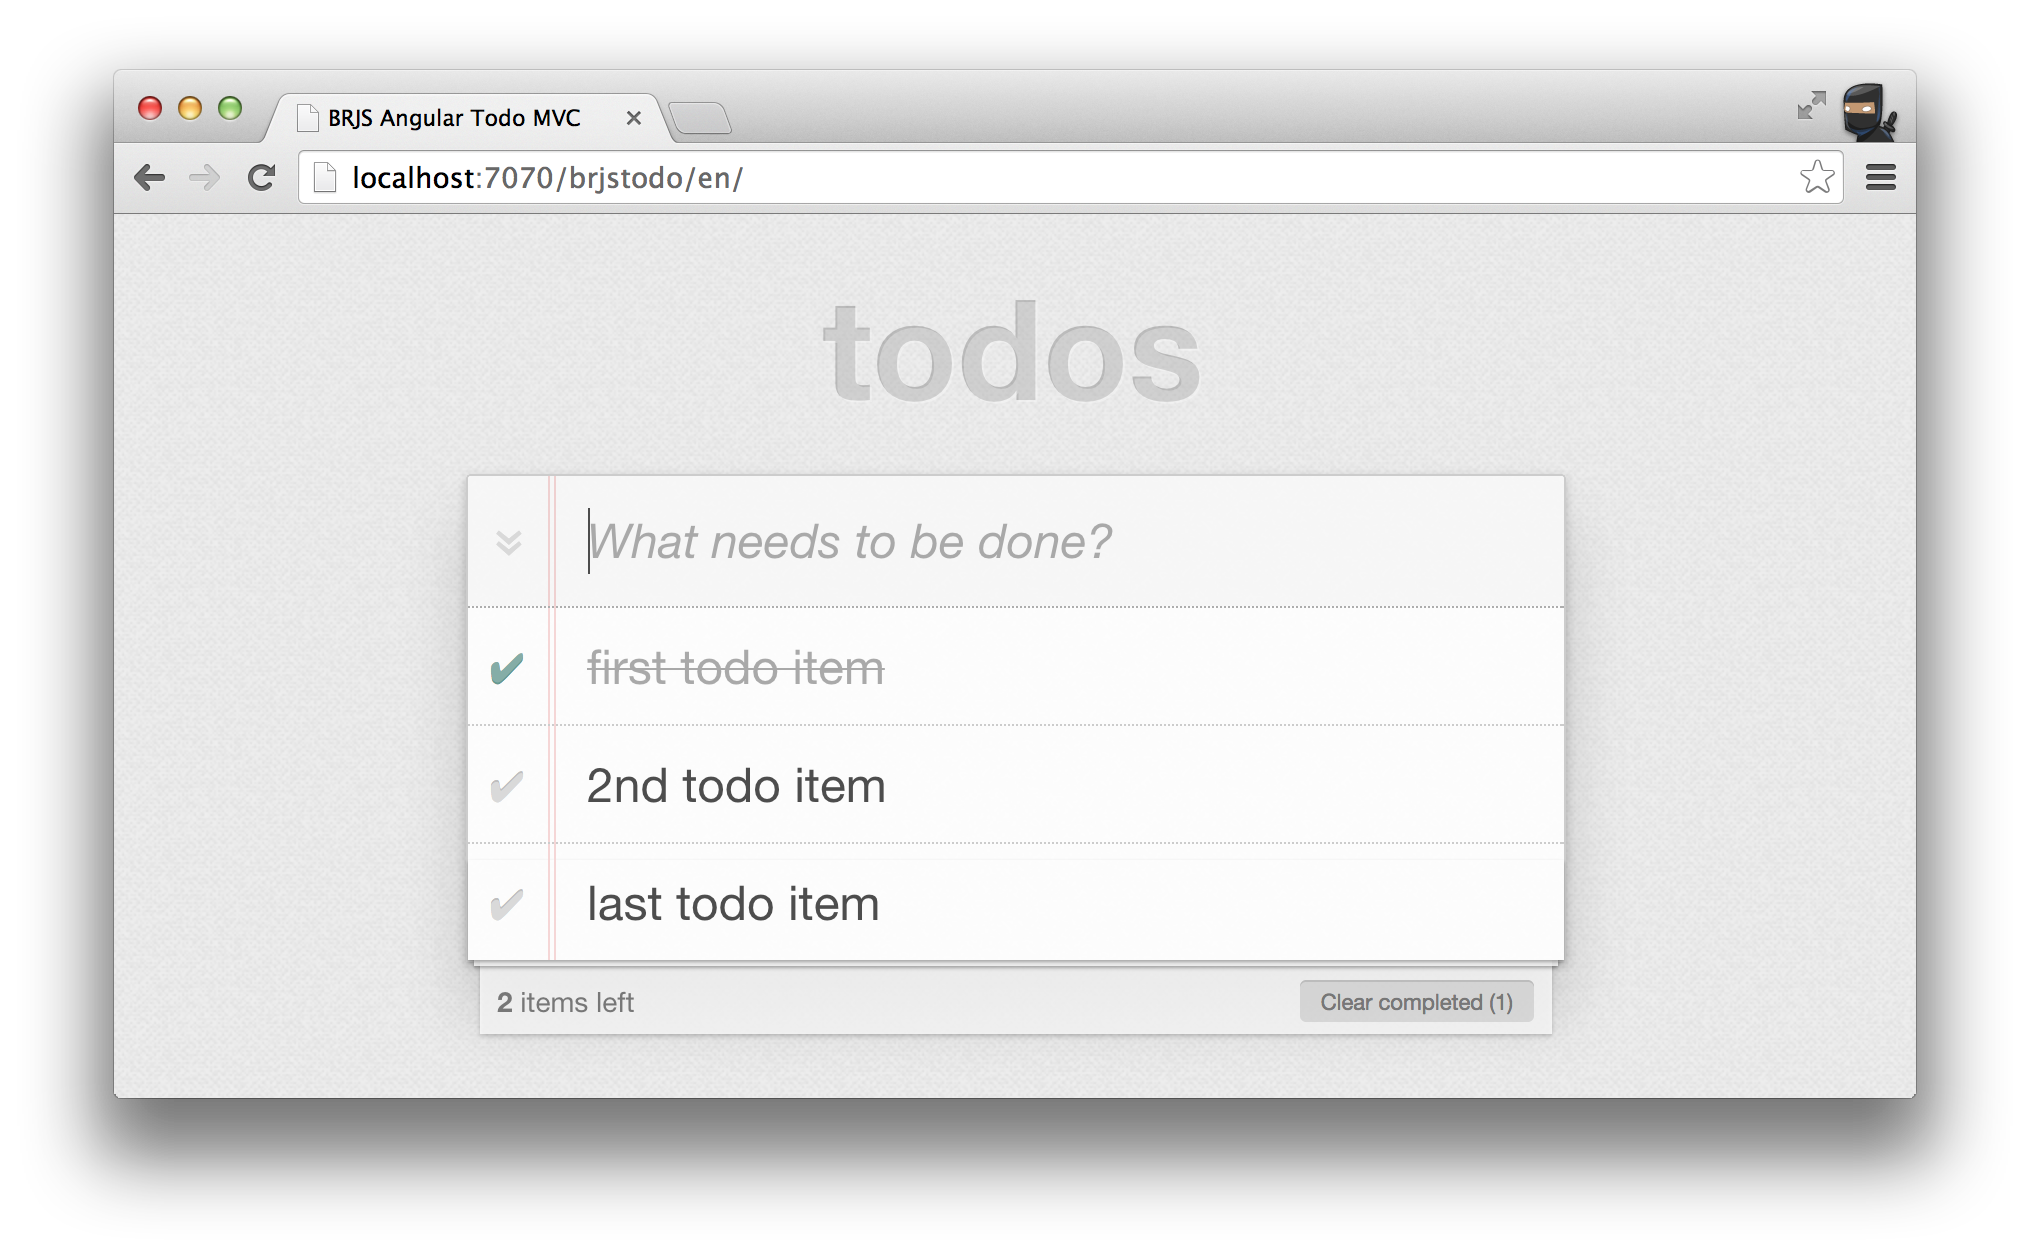
You can now view the full application running by going to http://localhost:7070/brjstodo/.
One of the main focuses of BladeRunnerJS it building applications in a modular way. Hopefully this tutorial has demonstrated both how to use BRJS with Angular and that Angular directives fit naturally into this approach and that there are a number of benefits of building the blade directives, building them in isolation in a workbench and composing an application out of components. Here are just a few:
Now, go forth and build truly scalable and modular front-end web apps with BladeRunnerJS and Angular!